Tip: Always use a system when you do an oil change: Do each part of the job in order, and don't change that order from job to job. This may sound unduly restrictive if you like to improvise, but if you ignore this advice, you may find that you've added the new oil before replacing the oil drain plug or the oil filter. In either case, you wind up with your brand-new oil all over the ground and not enough oil in the engine to drive to the store for more. Also, the minute you replace the oil drain plug, always tighten it completely and — so that you won't forget it — put in the new oil immediately. (Don't laugh; people have forgotten and have ruined their engines in a couple of miles.)
|
Although the oil change process takes 17 steps to explain, it shouldn't take more than 15 minutes to accomplish after you buy the necessary stuff. Follow these easy steps to change your oil and oil filter:
- Either park on level ground or in such a way that the oil drain plug is at the lower end of the oil pan.
Caution: Block the wheels, use jack stands, and don't jack the car up too high, or the oil may not drain out of the oil pan completely. If you can, jack up the vehicle so that the oil drain plug is at the lower end of the oil pan.
- Before you begin work, be sure your gearshift is in Park or Neutral with the parking brake on, and set out all your tools and equipment.
Place all the stuff you're going to use within easy reach so that you don't have to jump up and run around to the other side of the vehicle in the middle of the job.
- Warm up your engine for two or three minutes so that the gook gets churned up and can flow out of the engine easily.
Caution: You don't want the engine so hot that you burn yourself. When it's slightly warm, shut off the engine.
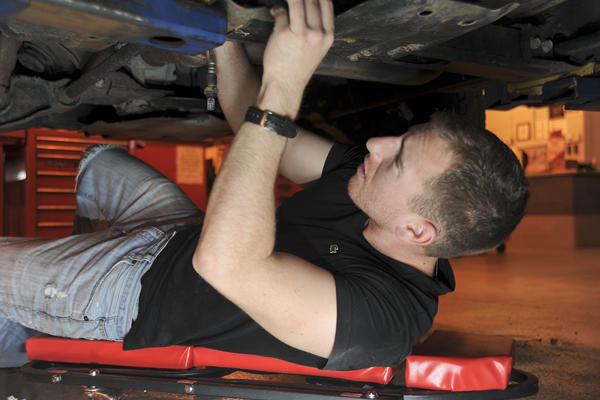
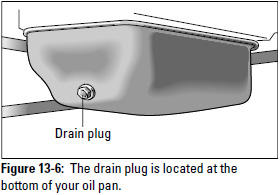
- Use a work light or flashlight to look under your car. You should be able to see and reach a large nut or plug located under the oil pan at the bottom of the engine (see Figure 13-6).
This is the oil drain plug. It unscrews with the aid of an adjustable wrench. If the plug is too hot to touch comfortably, let the engine cool off for a while longer.
Remember: If you can't reach your oil drain plug easily and you still want to do this job yourself, you'll have to either crawl under your car to reach the plug or jack up the car.
- Push the basin with the plastic bag opened inside it (or the oil-change container) under the oil drain plug so that it can catch the oil.
Caution: The oil may not come down vertically to start with; it may come out sideways from the direction the drain plug is facing. Allow room for that when you place the drain pan.
- Use your adjustable wrench to unscrew the oil drain plug until it's almost ready to come out. Then protect your hand with the dirty rag or a disposable plastic glove, and give the plug a last quick turn by hand to release it. Pull your hand away quickly so that you don't get oil all over yourself.
If the plug falls into the container, you can retrieve it later. The oil should drain out of your engine into the container (remember to retrieve the gasket if, against my recommendation, you're going to reuse it). While the oil drains, get out from under the vehicle and take a look under the hood.
- Remove the cap from the oil filler hole at the top of your engine.
This large cap is easy to recognize: It lifts or screws right off, revealing a largish hole.
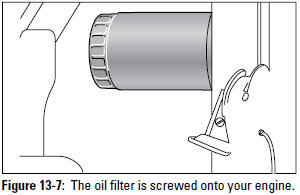
- Unscrew the oil filter using an oil filter wrench if you can't do it by hand.
Caution: The oil filter looks like a tin can that's screwed onto the engine (see Figure 13-7). Like most other things you find on a vehicle, the oil filter unscrews if you twist it counterclockwise. The old filter will have oil in it, so be careful not to dump it on anything when you remove it. If any remnants of the rubber seal from the old filter remain on your engine, scrape them off carefully, making sure they don't fall into the hole.
Remember: On some vehicles, you can easily reach the oil filter by leaning under the hood. Unfortunately, on other models the filter must be reached from under the vehicle. If your vehicle is one of these, you may have to jack the vehicle up to get at it.
- Empty the oil from the filter into the drain pan.
Use a screwdriver to punch a hole in the dome of the can (which releases the pressure in the filter) and invert it in the drain pan to allow the oil to flow out. When the filter has drained completely (this can take as long as 12 hours), wrap it in newspaper and set it aside to take to a recycling center with your old oil.
- While the old oil drains out of the engine, open a new bottle of oil. Dip a finger in the new oil and moisten the gasket on the top of the new oil filter. Then screw the new filter into the engine where the old one was.
Caution: Follow directions on the filter, or turn it gently until it settles into place, and then turn it another three-quarter turn. Unless the filter manufacturer specifically recommends it or there isn't enough space to get your hand into the area, don't use an oil filter wrench to tighten the filter. It should fit tightly, but you don't want to crush the gasket or the filter will leak.
- Reach under the vehicle again and use your dirty rag to wipe around the place where the oil drain plug goes.
- Replace the oil drain plug and use an adjustable wrench to tighten it. If your vehicle uses an oil drain plug gasket, make sure that the old one has been removed, and lay a new gasket on the pan before you replace the plug.
- After you install the oil filter and replace the oil drain plug, use a funnel — or just good aim — to pour all but one quart of fresh oil into the oil filler hole.
- Replace the oil filler cap and run the engine for 30 to 60 seconds while you check for leaks from the oil drain plug and around the filter.
The oil pressure light on your dashboard should go out in 10 or 15 seconds (or if your vehicle has an oil pressure gauge, the needle should move off of "Low"). Don't rev up your engine during this period. Your oil pressure ranges from zero to low while the light is on and won't reach the proper pressure until your oil filter fills up. If the light doesn't go out, check under the vehicle and around the engine for leaks. Running the engine circulates oil into the new oil filter, and because filters hold from a half to a full quart of oil, you want to be sure that your filter is full to get an accurate reading on the oil dipstick.
- Shut off the engine and wait five to ten minutes for the oil to settle into the oil pan. Then remove the oil dipstick, wipe it with a clean, lint-free rag, and shove it back in. Pull it out again and check it.
Your owner's manual should tell you where the dipstick is on your engine.
- Keep adding oil a little at a time and checking the stick until you reach the "Full" line on the dipstick.
- Remove the drain pan from under the vehicle, drive around the block a couple of times, let the oil settle down again, and recheck the dipstick and the dashboard indicator.
Caution: Never keep running an engine or drive a vehicle that tells you its oil pressure is low. Because oil not only lubricates but also helps cool the engine, you can ruin your engine if you drive even a short distance with insufficient oil or with a defective oil pump.
Tip: In Appendix B, enter the vehicle mileage and date of the oil change in the Maintenance Record and the oil filter make and part number, with the weight and amount of oil you needed, on the Specifications Record.
When you see how easy changing the oil is, you'll tend to change your oil more frequently, and your vehicle will perform better, last longer, burn less fuel, and cause less air pollution. You'll feel pretty happy with yourself, too!
Clean up spilled oil thoroughly
You can't just hose off oil you've spilled on the ground — it will only rise to the surface of the water and spread to a larger area. The best way to clean up spilled oil is to cover the oil with a generous layer of kitty litter, let it soak up the oil for a few hours (it will even pull some up out of the concrete or asphalt), then sweep up and properly dispose of the oil-soaked stuff. Next, squirt some liquid dishwashing soap onto the stain and scrub with a stiff brush; or on unpainted concrete, scrub the area with a solution of half laundry soap and half bleach. Wipe up the dirty cleaning liquid with paper or cloth towels, and rinse the area well.
|
Recycle your old oil and filter
Caution: Never dump oil onto the ground, throw it out with your regular garbage, or flush it down a drain. It's a major toxic pollutant that needs to be treated accordingly. In many locales, putting oil filters into a landfill is against the law, so you may risk a fine.
So what do you do with your old oil? Decant the oil from the garbage bag that was in your collection pan into clean disposable containers with tight-fitting, screw-on lids — the bottles that the new oil came in or old, washed soda bottles work well. Place a funnel in the neck of the container, tie-off the bag, and hold it above the funnel. Then cut a tiny hole in a bottom corner of the bag and let the oil drain out of the bag into the funnel and container. You may want to cover the ground underneath the container with a thick layer of newspapers.
Caution: Oil recyclers probably won't accept oil that's contaminated with another substance or in a dirty container, so take it to a toxic waste disposal center.
Eco-Logic: The Steel Recycling Institute says that if all the oil filters sold in the United States each year were recycled, enough material would be recovered to build 16 stadiums the size of Atlanta's Olympic Stadium! Many auto parts stores and some service stations accept old oil and oil filters for recycling. If you don't have one close by, look in your local yellow pages for the nearest oil recycling center or toxic waste disposal center, or visit www.earth911.org or www.filtercouncil.org and type in your zip code.
From Auto Repair for Dummies, copyright © 2009 by Wiley Publishing, Inc., Indianapolis, Indiana. Used by arrangement with John Wiley & Sons, Inc.