The space, or gap, between the center and side electrodes needs to be an exact distance across; otherwise, your plugs don't fire efficiently. Adjusting the distance between the two electrodesis called gapping your spark plugs.
Remember: Gap new as well as old spark plugs, even if the package says that the new plugs are "pre-gapped." To avoid problems, work on only one plug at a time, in cylinder sequence order.
The following steps explain how to gap your spark plugs:
1. If you're regapping a used plug, make sure that it's clean (gently scrub it with a wire brush). If you're using a new plug, it should be clean and new-looking, with the tip of the side electrode centered over the center electrode.
You shouldn't see any cracks or bubbles in the porcelain insulator, and the threads should be unbroken.
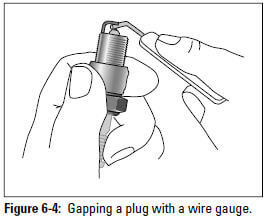
2. Select the proper number on your feeler gauge, and run the gauge between the electrodes (see Figure 6-4). If the gauge doesn't go through, or if it goes through too easily without touching the electrodes, you need to adjust the distance betweenthe electrodes.
3. Adjust the gap as necessary. If the wire didn't go through, the gap is too narrow. Hook the part of the feeler gauge that's used for bending electrodes under the side electrode and tug very gently to widen the gap. If the gauge goes through too easily without touching the electrodes, the gap is wide. Press the side electrode very gently against a clean, marproof surface until it's slightly bent down toward the center electrode.
4. Run the gauge through the gap again.
5. Repeat Steps 3 and 4 until the gap is just right. You want the gauge to go through fairly easily, just catching the electrodes as it passes.
If you keep adjusting the gap too narrow or too wide, don't feel bad. Everyone I know goes through the "too large–too small–too large" bit a couple of times for each plug, especially the perfectionists.
After you're done gapping your spark plug, it's time to insert it in the engine.
Installing a Spark Plug
To insert a spark plug into the engine, follow these steps:
1. Clean the spark plug hole in the cylinder block with a clean, lint-free cloth. Wipe away from the hole; don't shove any dirt into it.
2. Lightly coat the threads of the spark plug with a dab of oil from the oil dipstick, being careful not to get any on the center or side electrodes.
3. Carefully begin threading the spark plug into the engine by hand, turning it clockwise.
|
Leave Your Distributor to a Pro Most cars built after 1975 have electronic ignition systems that require no regular servicing. Some have no distributors at all. All testing and servicing of these systems should be left to trained professionals because they're easily damaged if hooked up improperly, and they employ high voltage that can also damage you. |
This is called "seating the plug." You have to do it by hand or you run the risk of starting the plug crooked and ruining the threads on the plugor the threads in the spark plug hole in the engine.
If you have trouble holding onto the plug, you can buy a spark plug starter and fit it over the plug. Or, you can use just about anything you can wrap around or slip over the plug top, including an old spark plug wire boot, a finger cut from a vinyl glove, an old piece of thin plastic tubing, or a piece of vacuum hose.
4. After you engage the plug by hand, turn it at least two full turns before utilizing the spark plug socket and ratchet.
5. Slip the spark plug socket over the spark plug, attach the ratchet handle, and continue turning the plug clockwise until you meet resistance. Don't over-tighten the plug (you can crack the porcelain); just get it in nice and tight with no wiggle. The plug should stick a little when you try to loosen it, but you should be able to loosen it again without straining yourself. Tighten and loosen the first plug once or twice to get the proper feel of the thing.
6. Take a look at the spark plug cable before attaching its boot to the plug. If the cable appears cracked, brittle, or frayed or is saturated with oil, have it replaced.
7. Before you attach the boot to the spark plug, apply some silicone lubricant to the inside of the boot; then push the boot over the exposed terminal of the new plug and press it firmly into place. You've just cleaned, gapped, and installed your first spark plug. Don't you feel terrific? Now you have only three, five, or seven more to do, depending on your engine.
8. Repeat the steps to remove, read, gap, and install each spark plug. It's at times like these that owners of 4-cylinder cars have the edge on those who drive those big, expensive 8-cylinder monsters. Unless, of course, they have two plugs in each cylinder.
When you're done, start your engine to prove to yourself that everything still works. Then wash your hands with hand cleaner. If you've had a hard time with a hard-to-reach plug, get some rest before taking on additional work.And take comfort in the fact that, next time, the job should be a breeze.
From Auto Repair for Dummies, copyright © 2009 by Wiley Publishing, Inc., Indianapolis, Indiana. Used by arrangement with John Wiley & Sons, Inc.