When buying a new hose, don't forget to buy new hose clamps. They should be large enough to fit the outside diameter of the hose.
|
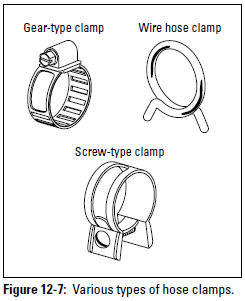
Clamps are so inexpensive that you should make it a habit to replace them whenever you change a hose. If you're changing a hose that was secured with wire hose clamps or screw-type clamps, replace them with gear-type clamps that can be removed and replaced easily. Figure 12-7 shows all three types of clamps. Here's how to deal with each kind:
- Wire hose clamps: I hate these clamps because they are relatively hard to deal with. If you need to change a hose that has them, use a pair of slip-joint pliers (see Chapter 3) to pinch the wire ends together so that you can slip them off the hose, and then replace them with gear-type clamps.
- Screw-type clamps: These clamps don't loosen easily, so they're often found on radiator hoses and the like to keep them in place. Unscrew the screw and remove it. Then slip your screwdriver under the clamp and loosen it. To avoid the hassle of reinserting the screw, replace with gear-type clamps.
- Gear-type clamps: These clamps are my favorites. Just use a screwdriver to turn the screw counterclockwise to loosen the clamp, slip the clamp over the hose, slip the end of the new hose in place, and turn the screw clockwise to tighten the clamp. Easy!
Tips: It's impossible to tell someone in a book how tight or loose a clamp should be. If the clamp is so tight that it appears to be cutting into the hose, loosen it. If you can hear or see air or liquid escaping from the ends of the hose, the clamp should be tighter. Give the hose a tug to see whether it's secure, and check it again after you run the engine, to make sure that it isn't leaking.
|
Replacing Hoses
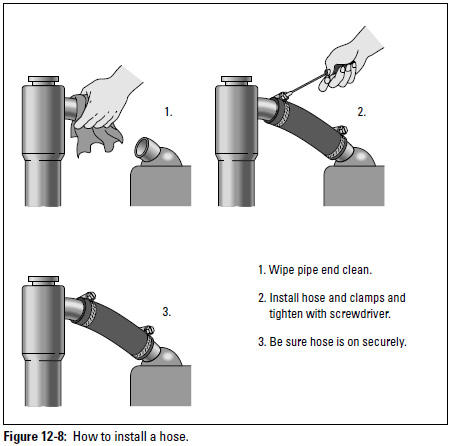
The basic process of changing a hose is quite simple (see Figure 12-8), but there are differences, depending on the type of hose you're replacing.
- If the hose is a vacuum hose, you'll find literally nothing in it. Just loosen the clamps, remove the hose, slide the new clamps on the new hose, slip the ends of the hose over whatever they connect to, and tighten the clamps.
- Caution: If the hose is a fuel hose, have a professional replace it. Fuel is not only highly flammable, but it's also toxic. The danger, effort, and time necessary to clean up any spills and to dispose of everything properly at a hazardous waste center just isn't worth trying to tackle this relatively inexpensive job yourself.
- If the hose contains liquid under pressure, before removing the hose, be sure that the engine is shut off and the liquid has been allowed to cool so the pressure is released.
To prevent leaks, some manuals suggest putting a water-resistant sealant on the ends of the fittings to which the hose connects. Because these sealants tend to make the hoses difficult to remove when you need to replace them again, I suggest that you try it without sealant first. In most cases, if the hose is the right one and the clamps are on tight enough, you should be able to get by without sealant. If the hose leaks, you can always go back and use the sealant as recommended.
- If the hose is a radiator or heater hose, to catch the coolant and water that will run out of the system, you'll need a bucket or pan that holds at least two gallons of liquid and will fit under the radiator drain valve (called the petcock) that drains the radiator.
Caution: Never allow coolant to drain onto the ground.
If you haven't flushed your cooling system and replaced the coolant in the past year, do so at the same time you replace the hose. (See the "Flushing Your System and Changing Your Coolant" section for instructions.)
Car Smarts: Some newer engines have cooling systems that need to be bled. If your engine falls in this category, the cooling system contains special bleeder screws. If you're not sure what type of system your vehicle has, check the owner's manual or ask a mechanic before you undertake this job. To do it properly, you need to follow instructions in the owner's manual or a service manual for your vehicle.
Follow these steps to replace a radiator or heater hose:
- Make sure that the parking brake is on and that the car is in Neutral or Park before you start work.
- Remove the pressure cap from the radiator or coolant reservoir, and place a bucket or drain pan under the radiator drain valve.
- Open the drain valve, allow the coolant to drain into the container, and then close the valve.
- Remove the clamps at both ends of the hose.
As I say in "Buying and replacing hose clamps" earlier in this chapter, you're going to replace those clamps, so if you can't remove them easily, cut them off. (If you haven't read that section, do so before going any further.)
- Carefully twist the hose to remove it, and use the container to catch the liquid that drains from it.
Be gentle when removing the hose. If you're not careful, you coulddamage the radiator.
- Use any degreaser or just a damp clean rag to clean the fittings that the new hose will attach to, and install new clamps over the hose (refer to Figure 12-8).
- Install the new hose, attaching and clamping one end securely in place before you tackle the other end.
Make sure that the hose won't interfere with any moving parts or touch the engine when it's hot, and that the clamps are tight.
- If the coolant that you drained is fairly new and your container was clean, pour the liquid back into the system; otherwise, refill the system with a 50/50 mix of fresh coolant and water.
If you're replacing the coolant, see "Keeping coolant out of the mouths of babes and small animals" for instructions on disposing of the old stuff safely.
- Start the engine and add more water and coolant as the level in the radiator drops.
Don't fill the radiator to the top of the neck or the coolant reservoir up to the "MAX" line until the thermostat opens. When the upper hose is hot, the thermostat has opened. Then it's okay to top off the radiator or the reservoir.
- Replace the pressure cap.
If your engine is the type that needs to be bled, do so now, following the instructions in the owner's manual or service manual for your vehicle.
- Run the engine and double-check that the clamps are nice and tight so that no liquid leaks out.
From Auto Repair for Dummies, copyright © 2009 by Wiley Publishing, Inc., Indianapolis, Indiana. Used by arrangement with John Wiley & Sons, Inc.