It’s a hot summer day, you’ve been baking in the sun, but now you’re behind the wheel of your trusted vehicle, ready to motor away, a cool blast from your air conditioner returning you to comfort and sanity.
Or not -- because your air conditioner is blowing warm instead of cool.
If you own your car long enough, sooner or later the day comes when this happens to you. Most of the time it usually means that you need to recharge the refrigerant in your AC system. Follow the step-by-step guide below to this process, all without breaking the bank.
1. R134 or R12?
Most cars built after 1994 use R132 refrigerant, which will make it easier for you to recharge the AC. If your car was built before 1994, there’s a good chance it uses R12 refrigerant, which means you’ll have to take it to your local car shop to get it recharged. If you fall into this category, ask your mechanic to change the refrigerant to R134, so you can recharge it yourself in the future. Whatever you do, do not attempt to recharge an AC system that uses R12 with R134!
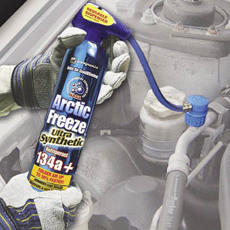
2. Refrigerant recharging kit
To recharge your AC yourself, get a recharging kit, which will include a can of pressurized refrigerant (aka freon) and a pressure gauge (measuring in PSI). Most auto stores will have an all-in-one kit which includes both the refrigerant can, a connecting hose and the pressure gauge. If the gauge needs to be assembled when you open up the kit, follow the instructions with the kit. You will also want to adjust the temperature readings on the gauge until they match the outside temperature. When the gauge is ready, turn it clockwise until it is sealed and connect the hose to it.
3. Low-pressure port
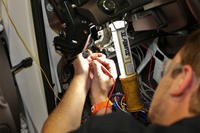
Your air conditioning system has two ports located under the hood, a low pressure port and a high pressure port. Check your vehicle’s manual for the location of your low-pressure port, which should also have a cap labeled “L”. Clean off the area around the port, then remove the cap and give the area another good cleaning -- your air conditioning system is very delicate, and even a little bit of grit can cause some serious damage if it gets into the system.
4. Attach the hose
After you’ve cleaned the low-pressure port and removed the cap, attach the hose to it. Your hose, when attached to the pressure gauge, will have two ends – one has a pin at the end of it (to break the seal on your refrigerant can). Using the end of the hose without the pin, slide the hose onto the port and latch on. Start your engine, turn the air conditioning on high, and wait for a few minutes, and then look at your pressure gauge. Most gauges will have a “green” or “safe” area where the pressure is good. The portion of the gauge in this area that matches your current outside temperature will tell you if the system is full. If those two areas don’t match up, it’s time to recharge the system.
5. Attach the can
Remove the hose from your low-pressure port and put the cap back on. Now turn your gauge counter-clockwise so that the pin on one end of the hose is retracted. Attach the end of the hose with the pin securely to your can, and then turn the gauge clockwise so that it pierces the can.
6. Recharge the system
Now reattach the other end of the hose to your low-pressure port, with the engine still running and the air conditioner at full-blast. Twist the pressure gauge counter-clockwise so that the refrigerant from the can enters the system. Keep an eye on your gauge and fill up your system to the point where the pressure and the outside temperature match. As you’re charging, also gently move the can back and forth to allow the refrigerant to come out evenly. When the pressure on the gauge is in the right area, turn the gauge tightly clockwise to stop the flow of refrigerant, remove the hose from the low-pressure port, replace the cap, and turn off your engine. You’re done! Hold onto your pressure gauge, you may need to use it again in future for further recharges.
")
")
")
")