No matter how well your vehicle is working, if your battery dies and can't be recharged, you're stranded in a vehicle that you can't drive in for service. A battery usually has a sticker on it that shows when you bought it and how long you can expect it to survive. To prevent being stuck on the road with a dead battery, enter that information in your Specifications Record in Appendix B andhave the battery replaced before it comes to the end of its life expectancy.
Deciding if you Should do the Job Yourself
Unless your vehicle has a shield over the battery that's difficult or dangerous to remove, it shouldn't be hard to replace it yourself. However, if installation and disposal are included in the price of a new battery, there may be no advantage in undertaking the job.
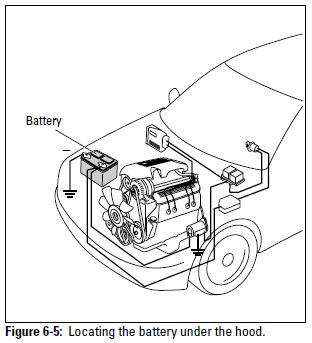
To further assist you in deciding whether or not to do the job, open the hood of your vehicle and find the battery. Figure 6-5 shows you where it's located and what it looks like. If the battery on your vehicle is concealed under a plastic shield, take a look at what's holding it in place. If you see just a few screws or bolts, you can probably unscrew them and remove the shield without much trouble. If it looks difficult to get the thing off, have the battery installed wherever you buy it.
Buying the Right Battery for Your Vehicle
If you've decided to replace your battery yourself, the first thing to do is to buy the right one. Keep the following in mind:
- If you haven't already put the information on your Specifications Record, consult your owner's manual to find the specifications for the battery designed for your vehicle.
- Buy a brand name battery at a reputable dealership, auto parts store, or battery dealer.
Tip: Batteries are priced by their life expectancy. Most are rated for five years. Don't risk getting stranded by a poor quality battery that malfunctions, but if you don't plan to keep your vehicle longer than five years, don't spring for an expensive long-term battery that will vastly outlive your need for it.
- Take the new battery out to your vehicle and compare it with the original one. It should be the same size, shape, and configuration. If it isn't, march right back in and return it for the right one.
Tip: While you're battery shopping, be sure you have all the stuff you need for the job. If you don't have an adjustable wrench, buy or borrow one. You'll also need a couple of clean lint-free rags, a pair of disposable latex gloves, some water and baking soda, and a battery brush. To protect your eyes from any deposits that can hurt them, invest in an inexpensive pair ofsafety goggles, too.
How to Remove and Install a Battery
When you have your equipment handy and you're ready to start, follow theseeasy steps:
1. Make sure that your vehicle is in Park, with the engine shut off and the parking brake on.
2. Open the hood and place a blanket or pad over the fender to protect it.
3. Remove the cables from the battery terminals.
Look in your owner's manual to see whether your vehicle has negative ground (most do). If it does, use an adjustable wrench to first loosen the nut and bolt on the clamp that holds the battery cable on the negative terminal. (That's the post with the little "–" or "NEG" on it.) If your vehicle has positive ground, loosen the cable with "+" or "POS" on it first. Remove the cable from the post and lay it out of your way. Then remove the other cable from its post and lay that aside.
Tip: If you have trouble loosening the bolt, grab it with one wrench and the nut with another, and move the wrenches in opposite directions. In this case, you don't want to remove the bolts; just loosen them enough torelease the cable clamps.
4. Remove whatever devices are holding the battery in place.
Tip: When you're removing a bolt or screw, after you've loosened it with a tool, turn it the last few turns by hand so that you have a firm grip on it when it comes loose and it doesn't drop and roll into obscurity.
5. When the battery is free, lift it out of its seat and place it out of your way.
6. If the tray on which the battery was standing is rusty or has deposits on it, clean it with a little baking soda dissolved in water. Wear your gloves because the battery stuff is corrosive and be sure the battery tray is completely dry before taking the next step!
7. Place the new battery on the tray, facing in the same direction as the old one did.
8. Replace the devices that held the old battery in place. Try to wiggle the battery to make sure it's completely secure.
9. Replace the battery cables on the terminals in reverse order from which you removed them. (If your vehicle has negative ground, the positive cable goes back first.) Make certain that the clamps holding the cables on the battery terminals are gripping the posts tightly.
10. Take the old battery to a recycling center that accepts batteries. Batteries are filled with a toxic, corrosive liquid and must be disposed of properly. What's more, old batteries are usually rebuilt into new ones, so just throwing one in the trash is doubly bad for the environment. If you have your new battery installed when you buy it, the shop will recycle the old one for you. They'll probably want to charge a few dollars for this service, but try to negotiate it into the price. You also can call your local recycling center for a referral.
From Auto Repair for Dummies, copyright © 2009 by Wiley Publishing, Inc., Indianapolis, Indiana. Used by arrangement with John Wiley & Sons, Inc.
")
")
")
")